Showing posts with label Purple. Show all posts

Tuesday, October 08, 2013

Tutorial Tuesday - How to turn a photo into a photo canvas

There are tons of ways to turn a beloved photo into a photo canvas. Do a quick google search or two and just see how many you find. My current preferred method is photo transfer and I thought I'd share the process with you one more time since it is TUTORIAL TUESDAY! 

I have searched and tried a few different methods but found my favorite on the "Come on Ilene" blog. I will outline my process here but you may also want to check out here wonderfully simple tutorial here: Make Your Own Canvas Prints.


So far I have made 2" x 3" up to 8" x 10". I'm planning on trying larger canvas sizes but would suggest starting small and moving up in size as you get more comfortable with the process and your results. 

You will need: 
  • Blank canvas
  • Photo printed with a laser printer on regular paper (not photo paper)
  • Gel medium
  • Water spray bottle
  • Foam paint brush
If you aren't a fan of mess, then you should probably cover your work space with a garbage bag (as Ilene suggests) or newspaper or wax paper. Then take your canvas and give it a thick coating of gel medium (I got mine at a local art store called Blick). I would say thick but not TOO thick otherwise in my brief experience, I end up with more air bubbles to push out and glue oozing out the sides. 

Make sure you have cut your image down to the size of your canvas (or maybe just a bit smaller on all sides). When you print, maybe SURE you reverse your image if you want it to appear correctly once you've transferred it to canvas. Of course you may not have to depending on your image, but remember this if you have any wording in your picture or it will be obvious what you did! 


Gently place your image photo side down onto the gel on the canvas and then carefully push out all air bubbles and make sure your image is flat on your canvas. 


Let your project dry for 5 hours to overnight. Then the fun begins! 

Fill your spray bottle with water. Spray your canvas until the paper is saturated and give it a few minutes to soak in. Then you want to start gently rubbing the paper off with your fingers. Be especially careful around key elements of your image so that they don't get rubbed off -- such as faces. You will probably have to do this step multiple times until your image is completely paper free. 


When you are satisfied with your image (and lack of paper on it), allow your canvas to dry thoroughly. Give it a final coat of gel medium and voila -- you have a gorgeous photo canvas! 


 This one just so happens to be a mini-canvas and is available in my shop 

Floral Mini Canvas - Image of Deep Bright Purple Daisies - Photo Transfer. 

Tuesday, July 23, 2013

Tutorial Tuesday - Photo Canvas Laser Printer on Paper Method

I have seen many different ways to put photos onto a canvas. 

I put my purple power photo onto a canvas before by mounting a photo print directly to the canvas and then using Hodge Podge and paint to give it texture and a bit of a canvas art feel. I was happy to sell this to someone who loved it as much as I did at last month's (and my first) Last Thursday in Portland! 


With a Miniature show coming up at Side Street Gallery, I was moving forward with several small photo canvases with this same method when I realized there was a different way that I wanted to try! Thanks to Ilene over at the "Come on Ilene" blog for sharing your wonderfully simple tutorial:  Make Your Own Canvas Prints. I followed her directions last night and came up with this new version of "Purple Power": 


So if you want to give this a try, I might suggest starting small and working your way to larger sizes of canvas when you get comfortable with the technique. Right now I'm specifically making ones that are small (mostly 2.5" x 3.5"). 

You will need: 

  • Blank canvas
  • Photo printed with a laser printer on regular paper
  • Gel medium
  • Water spray bottle
  • Foam paint brush
  • Option sponge
If you aren't a fan of mess, then you should probably cover your work space with a garbage bag (as Ilene suggests) or newspaper or wax paper. Then take your canvas and give it a thick coating of gel medium (I got mine at a local art store called Blick's). I would say thick but not TOO thick otherwise in my brief experience, I end up with more air bubbles to push out and glue oozing out the sides. 

Make sure you have cut your image down to the size of your canvas (or maybe just a bit smaller on all sides). When you print, maybe SURE you reverse your image if you want it to appear correctly once you've transferred it to canvas. I made this mistake last night and think I've learned my lesson. Gently place your image photo side down onto the gel on the canvas and then carefully push out all air bubbles and make sure your image is flat on your canvas. 
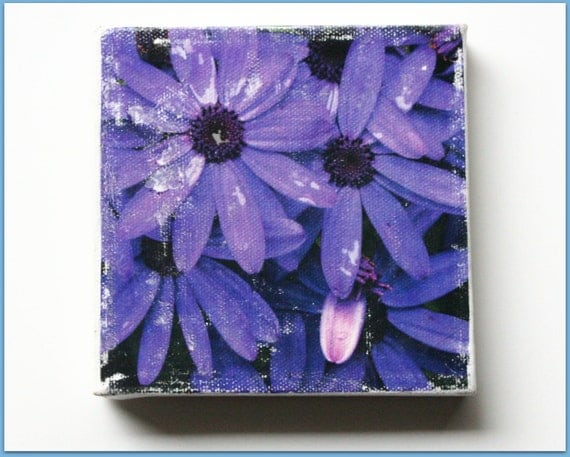
Let your project dry for 5 hours to overnight. Then the fun begins! 

Fill your spray bottle with water. Spray your canvas until the paper is saturated and give it a few minutes to soak in. Then you want to start gently rubbing the paper off with your fingers. Be especially careful around key elements of your image so that they don't get rubbed off -- such as faces. You will probably have to do this step multiple times until your image is completely paper free. 

When you are satisfied with your image (and lack of paper on it), allow your canvas to dry thoroughly. Give it a final coat of gel medium and voila -- you have a gorgeous photo canvas! 

Unfortunately for you (or me maybe) all of my little canvases are down in my studio drying for a few more hours before I can finish and share with you. Maybe tomorrow on "What a Shot" Wednesday! Stay tuned. 

Monday, July 22, 2013

Mama Monday - Whoops Edition

I wasn't going to blog today because honestly I didn't really have any "Mama" moments or pieces of wisdom to share. 

And then I wasn't going to blog because I was so excited about tomorrow's blog post... Tutorial Tuesday! I worked on magnets last night (not sure how well they worked out). 

I also created two little pendants that I think look pretty fun. 

I got started on an idea for mini photos on canvas and started by painting some black acrylic paint on them, allowing them to dry. Then today, I decided I wanted to go another way (which doesn't include black paint) and had to change my plans a bit. 

On my lunch break, I went to the art store and got: 
  • gel medium 
  • sponge brushes
I got home and realized that the one thing I hadn't planned on this morning (when revising my plans) was that my prints could no longer be on photo paper (as they had been), they could no longer be ink jet (as they would be if printed on my printer) -- they had to be laser prints! 

I then tried to upload and have them printed at Kinko's but they wouldn't be ready until tomorrow. Not good enough for me in my creative frenzy - nope! So I put the document on a thumb drive and raced up to my local Kinko's to print two copies. So far so good. 

Then I swung by Joann's and got new canvas's to replace those with black paint on them. Good to go - I thought! 

Of course, the second I got into the house I headed for my studio to get started only to realize that I'd forgotten one crucial thing. What could it be? I had totally forgotten to flip the images so that when I put them on canvas they won't be backwards! Ugh. I had three images to do and figured that the one with numbers and letters on it can't be backwards without being noticed nor could the one that albeit small says Blacksmith right on it! 

I couldn't stand not trying at least once canvas tonight (even though it needs to dry for 4-5 hours -- which means after midnight!) so I'm going ahead with the Purple Power canvas... let's see who notices the image is flipped! 

So... long post short (not really)... if you want to see how to make your own photo canvas (different technique than the last one I've shown), tune in tomorrow for Tutorial Tuesday!

Sunday, June 23, 2013

Studio Sunday - What's in the studio now?

The studio is filling up with things this week as I prepare for my first ever attempt to sell at a street fair. 

Portland, Oregon has a tradition of a fairly formal First Friday which kicks off art exhibits throughout the studios of our fair city. In contrast, the funky and far less traditional Last Thursday in NE Portland combines some art gallery openings along with street art and food vendors. 

I am taking several of my mounted art photo pieces which only needed to be priced and bagged. I'm not taking the larger prints just for ease of set up. 

In addition, I have made photo light switch covers and am in process with a handful of double-thick glass magnets. The floral images were a given, but Bat Penny -- now that is something new -- in magnet form. 
Check out the magnet making tutorial here.

I'm currently working on printing out and putting together a selection of photo cards for Thursday as well. I am printing out some that are already in the shop and a few that have never been. Come to Last Thursday and maybe you can see them for yourself!


And when I'm done with all that, here is my stack of wood for wedding signs. I have 6 5x10's to make as well as a couple of larger ones that can be used during ceremonies. 
Now that you've seen what's in my studio tonight, I thought I'd share a few other artists and what is in their studio too. I love checking out what others are doing -- it is inspirational and fun. Here is a peek into the studio of Cheryl Grant, an illustrator in Virginia.  Check out what's in her studio currently by clicking on the link below:

Illustrated by Cheryl Blog


And for a change of pace, check out the website of local Portland, Oregon artist (and Mama) Jolyn Fry: http://www.jolynfry.com/.  This may not be her studio but you can get a feel for the beautiful art she creates. Check out these artists and maybe, just maybe stop by Last Thursday. We'd love to see you! And last but not least... 
Here's something going in my house, but not my studio. Poor kitty is trying to adjust to the loss of her beloved couch (replaced by two leather chairs), but somehow I think she'll make it! 

Ciao for now, 
Mama Zuzi 

Tuesday, June 18, 2013

Tutorial Tuesday - Photo Light Switch Cover

1. Select your photo and size it to the size of your your switch cover. 

2. Tape either a sheet of tissue or other soft nubbly paper to an 8.5 " x 11 " paper to help it go through your printer and print.

3. Cut out your image just slightly larger than your image. 

4. Glue down your image onto the switch plate cover.
I used a spray adhesive. 

5. Paint over your image carefully with a layer of Hodge Podge.
 
6. Using a natural sponge, I like to add a soft white (or other color) border. 
And now ... unlike on television cooking shows ... my switch plate must dry. Visit tomorrow for the big reveal. Sorry if this tutorial feels a little "thrown together" but I have been busy and finding it hard to not only find a tutorial to share but do it and photograph it too! 

In the mean time, you may want to check out this fun DIY switch plate cover with splattered paint. Don't forget the drop cloth! 

http://www.cutoutandkeep.net/projects/splat-light-switch-cover

Ciao for now, 
Mama Zuzi 

Saturday, April 13, 2013

Making the photo canvas


Prepping the canvas

1. For this version of a photo on canvas, I used a pre-made canvas and painted the sides black. I also carried the paint onto the front of the canvas just about 1/4 inch. 

Adding the photo


2. After the paint dried (left it for a day or two), I cut the image down to be just smaller all the way around than the canvas. 

3. I attached the digital photo onto the canvas with an adhesive spray. 


Sealing/Texturing

4. After an hour or so, I applied hodge podge to the sides of the image and the image itself. In this case, I used a paint roller to give it a bit of texture. I let that dry for a few hours before doing a 2nd coat. 

and voila!


5. Last but not least, after all was dry I added a bit more black to the front edges to blend the photo edges with the canvas. 

You can purchase this very piece online now at:
https://www.etsy.com/listing/129394094/purple-power-flowers-canvas?ref=shop_home_active.

To DIY, you can also purchase most of these items at a Joann's Fabrics near you or any local craft store and the Purple Power (flowers) print at Mama Picture This here: https://www.etsy.com/listing/102793659/purple-blaze-digital-art-print-not? (the listing is for an 11"x11" print but happy to special order 8"x8" or other sizes, just contact me. 


Saturday, June 30, 2012

Hip to be Square

With a tween in my house, I'm certain with each passing year I become less "hip" despite no doubt having more hips. On that front (my hips), I'm adding a little Vitamin D to my diet in hopes that it just might kick start some weight loss but I am not (repeat not) holding my breath!

While I may not be as hip as I used to be (if I ever really was), I believe I am more at ease with myself and better able to fully enjoy the things I do... such as exploring my photography and ways to display it. I may no longer work and dine with the likes of INXS or Debbie Gibson or go dancing with Marc Anthony, but I'm more comfortable in my own skin.

And so I decided the other day that it was time to do some experimenting. I made a trip with my 9-year old daughter to the local craft store and the photo below shows just what made it's way home with us (other than some projects for the girl). 


Since my shot of purple flowers has been popular, I decided it might be fun to make it available on canvas. I'm going to try it on (as you can see) a 5"x5" size canvas and an 8"x8" one. 

Then the girl and I saw these adorable little cardboard frames that come ready to hang with their own twine and we just HAD to have them. Purple Blaze is a likely candidate for one of these as is Leaf Love. They might make the cutest little pics to hang in a child's room or a guest bathroom! Square artwork on wood, in frames, on canvas etc. do seem to be all the "hip" rage when I look around Etsy and the Internet..

Once I get my prints, I'll have to get a little Hodge Podge and some craft paint to round out my experiments. Soon enough we shall see if my photos can look "hip" in/on these squares! 

Now I'm going to go play a little Huey Lewis & The News. 


If you know who I am talking about, you may no longer be "hip" either! 

Back at 'cha soon.


Thursday, June 28, 2012

So smooth

Morning and night lately, I find that I crave two things. 

1) A sale in my shop & 
2) Smoothies! 

Around the same time that I added my newest photos (from the Fizz show) into my Etsy shop, I tried Dr Oz's (or Dr. Fuhrman's) supposedly great healthy crash diet. Well crash it did. I lost all of 1 pound and have in the Etsy shop made all of 1 sale - but I'll take it! 

Have a 1-day sale, make a sale. It works! 

Even my daughter is getting into it... advising me what to do or think about my shop and regularly requesting her own smoothies. 

This morning, the girl had mango/strawberry smoothie while I had banana/raspberry/pomegranate/strawberry/peanut butter/kale! Sounds truly atrocious when you get to the kale but it is delicious! 

It even looks good... I should have shot the mango one because the color was sublime and the texture perfection... but alas I did not. But here in all it's glory, is my smoothie and my sale. 

I'm hoping with enough of each I just might lose more than 1 pound by the end of the summer and be able to pay my nanny bill too! 

Now I'm going to spend some time thinking about other ways to display my photos... such as small wood blocks (ready to hang), necklaces or on canvas. Thinking, thinking, thinking... 

More soon.

Saturday, June 23, 2012

Feeling Purple

Today I'm feeling pretty purple. What might that mean? 
Purple is royalty. A mysterious color, it is associated with both nobility and spirituality. The opposites of hot red and cool blue combine to create this intriguing color.
Purple has a special, almost sacred place in nature: lavender, orchid, lilac, and violet flowers are often delicate and considered precious. Because it is derived from the mixing of a strong warm and strong cool color it has both warm and cool properties. A purple room can boost a child's imagination or an artist's creativity. Too much though, like blue, could result in moodiness.*
It has been a good month. My photo show, my birthday, my hubby finally getting a great job he deserves! 


I feel too as though I'm finally allowing myself to feel good enough to prioritize my own creativity and to move forward and that feels royal and spiritual and well... purple. 


Maybe I'm connecting to this image because it has boosted my imagination or my creativity. 


It is not too red nor too blue. It is perfectly purple... 'tis true!


And it is in my "Eye Candy" show and now in my Etsy Shop too. If you love purple, this just may be the print for you!